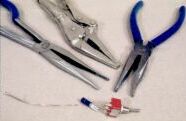
Other Systems I love train sounds and got an MRC Tech II sound generator system for cab A. I mounted the speaker for this under the mountain that fills most of the northwest quadrant of my railroad. It uses both AC and DC from an MRC Railpower cab. It works great, and makes either diesel or steam running and whistle/horn sounds. The uncouplers are modified Kadee #708 HOn3 magne-electric uncouplers, powered by the 19-volt AC terminals of a separate MRC Railpower 1370, through momentary pushbuttons. This same 1370 powers the DT-4s through its DC terminals and the Snapper capacitor discharge switch machine powering unit through it's 19-volt AC terminals. The lighting power supply is a 12-volt AC transformer with 12 volts for all lighting and a 6-volt winding which is perfect for all 46 panel lights—they get too hot and are too bright at 12 volts. I used mostly the smallest size of butt connectors (for #18 to #22 wire) to connect wires, and I used the female quick disconnect .110" solderless connectors for the DT-4 and all the block switches and turnout switches. The switches were all GC miniature bat handle toggle switches of two types: on-off-on DPDTs for blocks and momentary SPDTs for turnout control. The Peco turnouts work fantastic, but their switch machines and auxiliary switches are less well built, in my opinion. Three of the former and two of the latter failed and had to be replaced due to defect. I might have been able to replace the 19-volt AC switch power source with a 24-volt one and make a couple of the bad switch machines come to life, but since the rest work just fine with 19 volts (the Snapper helps), I decided not to spring for the $52 (quoted by a local electronics house for a 2-amp, 24-volt transformer—but I later found one in an electronics surplus place for under $10 and am using it on my next layout). So I decided that although the switch machines are okay for the Deep Rock Railroad, the Squirrel Valley Railroad—my second N-scale pike—would have Tortoises only. All wires enter the control panel via labeled screw-type terminal strips. These are easy to use. So are butt connectors, and soldering joints aren't much of a hassle either. But solderless connectors are another story. It takes a lot of force to get them on switch terminals and DT-4 terminals, and it's easy to bend (and break!) terminals on the GC miniature switches if you're not really careful. And there's an even bigger problem, and since I had hundreds of these connections to make, this is important: Wiring tip: You need to jam these connectors onto the terminals with needle-nose pliers because you'd quickly end up with bloody fingers if you tried to do without them. The things try to bend sideways when being jammed onto the terminals of the panel-mounted switches. (It helps a lot to have one hand gripping the pliers handles and the other gripping the pliers as close to the connector as possible, and it's essential to view the terminals edge-on as you're installing them—so you can avoid even the slightest angle between terminal and connector.) They also present a logistics problem: There's no space for the plier's nose once you've put a couple of connectors on! I checked regular hardware stores and couldn't find a single pair with really thin nose parts and also finely serrated surfaces for grip, but a specialty tool store had two tools that were useful. One was a long-handled needle-nose pliers with very thin—and serrated—nose parts and 7 ¼" handles (overall length 11 3/8"). The long handles were great for supplying the leverage needed to hold the connectors from slipping when being pushed onto GC miniature switches, and the thin nose parts—which tapered to the needed 1/16" per pincer—were perfect for dealing with space problems due to the closeness of the switches terminals to each other. The other tool that I found was a needle-nose vice-grips. This was especially good for installing these connectors on Circuitron electronics devices like DT-4s and AR-2s. Trying to push the connectors into place resulted in bent connectors or terminals, but gently pounding on the vice-grip adjustment screw with a small hammer made installing the connectors a cinch. If you have a needle-nose pliers whose nose is too thick, you can make it useful for putting connectors on miniature switches with a grinding wheel. I did this also, for comparison purposes. I reduced the thickness of one pincer from over 1/8" to 1/16". I also ground down the width to 5/32". The 1/16" was the absolute maximum for one pincer in order to jam connectors onto terminals when there are already other terminals in place. And there's one important rule to follow (unless both pincers are ground down to 1/16"): Never leave the inside terminal for last. In other words, if there are three terminals in a row, like on SPDTs and DPDTs, do the middle ones first. There's absolutely no room for anything more than a 1/16" pincer on either side of a center terminal with its connectors already in place. Actually, there's not even room for the pincer, but that's where the hard squeezing of the connector comes in: it flattens the plastic insulation on the solderless connector and creates space for the pincer. By the way, the two specialty tools beat my ground-down needle-nose pliers for steadiness and functionality, and especially hand pain. (They caused little pain, but my pliers had such poor leverage compared to the other that in order to hold the connectors tight enough so they wouldn't slip, I had to squeeze the dang things so hard I actually got a bruised thumb.) |

