The Industries The Black Hills Coal Mine cited previously serves not just the nearby coal yard (which feeds furnaces in local homes) and the Squirrel Valley coal bunker (which feeds steam locos), but points east as well, as already mentioned. The Pine Mountain area sports 60-some actual feet of switchbacks to enable the SW9/1200s to move logs from high up the mountain to the log mill where it turns into lumber. The lumber gets hauled to a toy factory and lumber yard. The layout features a dual-purpose smelter east of Seyless. It handles the gold ore from the gold mill west of it. The gold ore originates from the gold mines west of the gold mill. This smelter also handles the lead ore from the lead mill south of it. The lead ore originates from the lead mine south of the lead mill. There's a special, dedicated run of track which runs from both mills to and through the smelter, so ore drop-offs are done very conveniently. The waterfront area sports a fish processing plant at the edge of a dock; rails bring fish from boats at the dock. This area has lots of warehouses and factories. Nutville boasts a nut packing plant and a sand and gravel outfit north of the commercial district. The packing plant is a drive-through affair. (Hold the fries.) Finally, the tourism industry appreciates the money brought into the locality by the excursion train that runs 107' high up in the mountains that border the area south of Nutville and run behind the logging area and through the Panic Peak area and extend down to Woodpecker Junction, as far south as this layout goes. The engine is an Erie Lackawanna U25B. The train reverses at each end of the line, but the engineer isn't about to attempt backing five passenger cars through mountain tunnels. So the engineer must perform runaround operations with the loco using runaround tracks at each end of the line. See fig. 2 a couple of web pages back. |
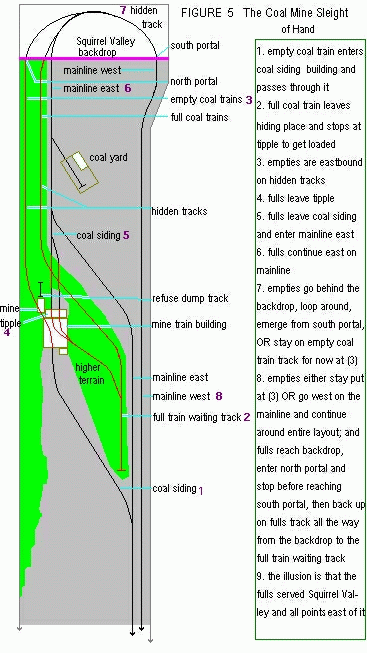
The third hat trick is the coal mine operation. Unlike lead trains, gold trains,
and log trains, the coal trains connect to the mainline. The empties exit the mainline
at the Black Hills turnoff and enter the mine building complex, but take
a hidden left turn out the side of the mine complex and keep going through a
long hidden section under the elevated narrow gauge interurban line. This train
runs behind the Squirrel Valley backdrop and then exits the backdrop at the Squirrel
Valley station, after which it goes around the layout until it once again
exits the mainline at the Black Hills turnoff. But there's more to the trick: Right when the empties are entering the mine building complex shed, a hidden full coal train (it had been concealed under a nearby hill) enters the building from the other side and comes out of the end of this building and stops under the coal tipple. The illusion is that the empty train that just entered the building is now under the tipple getting filled. I wasn't about to risk black lung disease by loading real coal via real tipples, so I had to simulate the empty-to-full scenario. This full coal train leaves the coal siding and switches onto the mainline. It follows the mainline up through the Squirrel Valley backdrop, a turnout is thrown, and the train now backs up all the way to its hiding place under the hill southwest of the mine. The illusion created is that many points east of the mine get served by this full train, and when the empty train goes around the entire 210-foot layout, points east must have emptied it of coal. It should go without saying that this trick also needs the aid of my not-much-to-look-at Opto-Sensor assistants, because panel lights that locate train position are the best way I found to perform all the hidden train operations. See fig. 5. |
