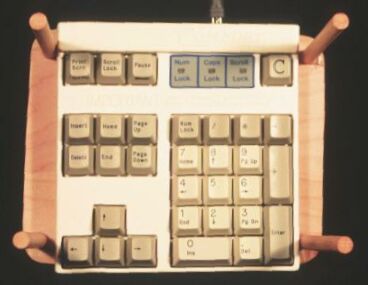
The Comfort Keyboard's three sections are ideal for helping side-lying people with the idle hand problem,
which slows productivity down to a crawl. But you'll need to make one or two
stilts. Consult a different part of this site for details on keyboard remapping, hand positions for stilt use, and general stilt use guidelines. Building a stilt isn't hard unless you aren't good with tools, in which case you should find someone who can use a drill and jigsaw. Cut a 6-inch by 7 ½-inch (6-inch by 8 ½-inch if it's for the keyboard section with the Backspace) piece of ½-inch plywood and round the corners. Sand it. Get a couple of feet of 3/8-inch dowel and some Tacky Glue. Cut four pieces of dowel 4 ½-inches long-or longer if you have very long fingers. Go really slow when the cuts are nearly done so you don't split the wood. Finer toothed saw blades are helpful for this purpose. Get a sheet of paper, cut it to the exact shape of the plywood, label one side "against wood," and then put the keyboard section on the paper where you want it and trace around it. Keep in mind that the dowel holes must be off to the sides of the keyboard, and your typing fingers must not discover that the finished stilt has dowels that are in their way. Drill the 3/8-inch holes about ¼-inch from the edge of the plywood, but don't glue in the dowels yet. Get a small nail and study the back of the keyboard section. There are three relevant screws on the back of the section with Tab, and four screws worth using on each of the other two sections. Study their positions and then put the section facedown and put the template on it with the label showing and use the nail to make a depression centered on each screw. Remove the screws and get ½-inch-longer versions of them at a good hardware store, matching the threads and screw thickness. To be safe, get the next size up and down for each screw in addition to the ones that will probably work okay. When you remove screws from the keyboard, you might cause something in the keyboard to get shifted unless you're careful, so leave the upside-down keyboard unmolested until you're ready to screw it to the stilt. Use the paper template to guide you in drilling the screw holes through the plywood—make them extra big but less than the diameter of the screw heads. Check out, by feeling with a small nail, if the plywood holes line up with the keyboard screw holes. You'll likely have to fudge a little and end up with a slightly oblong hole or two. The best ways to avoid this is to use a level workbench and a drill press or at least a drill with a leveling bubble on it, use a nail to start your holes so they're precise, and make sure your template is used to mark the holes on the side of the plywood the keyboard will be on. Screw in all screws slightly to make sure you can and to keep the keyboard's inner parts lined up, and then screw them all the way in. If you overtighten them they'll strip. If any screw is too short, it won't go in far enough and you'll want to get a longer one or use a countersink. A screw is too long if it's tight in the keyboard but protrudes from the plywood—use a shorter one or a washer. If you're sure you're going to need only one stilt and won't be switching sides, that stilt's dowels may get glued now—see below. But if you'll be touch typing and switching sides, get dowels big enough to fit the holes tightly enough so they won't slip and forget about gluing, think "press fit." As you'll see, the two inner legs of either stilt will be removed when you switch sides, since they'll stick up in the air and get in the way otherwise. Use the Tacky Glue (Elmer's is my second choice) and glue in any dowels you'll never need to adjust, but not until you test them glue-less (if you have to shorten them, you don't want to try to saw them once they're glued in). Rattail file the holes bigger if the dowels won't fit even if sanded. It's okay if you have to tap them in with a hammer once there's glue in the holes. If a dowel is loose, glue a strip of paper around the dowel as a shim. Let the glue dry for 24 hours before using the stilt. |
Building a Stilt Keyboard |